How Do You Transfer Ashes Into an Urn?
For many families, the hardest decisions feel finished once cremation is complete. Then a quieter question appears: how do you transfer ashes into an urn without making a mess, doing something wrong, or turning a tender moment into a stressful one?
If you are standing in front of a temporary container and a new urn, you are not alone. This is a common concern, and it is usually more manageable than people expect. In many cases, cremated remains are returned inside a durable inner bag, which means the transfer may be simpler and cleaner than you imagined.
Some families want to handle the transfer themselves because they want the moment to be private. Others would rather have the funeral home or crematory do it. Both choices are reasonable. What matters is that the transfer is handled slowly, respectfully, and with the right setup.
Families often say ashes, while funeral professionals may say cremated remains. In this article, the two phrases mean the same thing. Whether you are moving the full amount into a permanent urn, placing a portion into keepsakes, or preparing for burial or display, the basic approach is the same: choose the right container, work in a calm space, and do not rush.
The Short Answer
You usually transfer ashes into an urn by opening the temporary container, checking how the remains are packaged, and then either placing the inner bag directly into the urn or carefully pouring the cremated remains into the urn with a funnel. Which method is best depends on the size and opening of the urn.
If the inner bag fits comfortably, that is often the easiest and cleanest option. If it does not fit, a slow pour over a protected work surface is the better approach. And if you are uneasy about doing it yourself, the funeral home or crematory can often help.
What You Usually Receive From the Crematory
Before you start, it helps to understand what you are actually working with. Many families assume they will open a box and immediately be handling loose ashes. Often, that is not the case.
In many situations, cremated remains are returned in a temporary container with the remains placed inside a strong plastic bag. That matters because your first step is often not handling loose material at all. Instead, you may be moving a contained bag from one vessel to another.
The temporary container may be simple plastic, cardboard, or another basic material meant for short-term holding. Some families keep it for a while, especially if they have not chosen a permanent urn yet. Others want to move the remains into a selected urn right away because it feels more personal or more secure for long-term placement.
You may also find identifying paperwork, a label, or a metal identification disc associated with the remains. If so, keep those items with the remains and do not discard anything until the transfer is finished and the urn is properly closed.
Before You Start, Make Sure the Urn Is the Right One
One of the most common reasons a transfer becomes stressful is simple: the urn is too small, or the opening is narrower than expected. Before you do anything else, check that the urn is meant to hold the amount you plan to place inside it.
Decorative urns can be misleading. A vessel may look substantial from the outside and still have less interior space than you expect. If you are transferring a full set of remains, make sure the urn is sized for full capacity. If you are using a keepsake urn, jewelry, or several small memorial containers, remember that those are usually intended for only a portion of the remains.
Also check how the urn opens. Some have a lid at the top. Others open from the bottom with a plate secured by screws. A few have narrower necks that make transfer more delicate. Knowing the closure style in advance helps you gather the right tools and avoid awkward surprises halfway through the process.
If the urn came with instructions, read them first. If it came with a bag liner, threaded lid, screws, or sealant, lay everything out before you begin.
Set Up a Clean, Calm Workspace First
The best place to transfer ashes into an urn is usually indoors, on a flat and stable surface, with enough room to work slowly. This is not a task to do while balancing the urn in your lap or working near an open window with a breeze coming through.
Choose a table where you can sit or stand comfortably. Turn off fans. Close nearby windows. Keep pets and young children out of the room for a little while. If you are feeling emotionally unsteady, it may help to have another trusted person present so one of you can hold the urn or pass supplies while the other handles the transfer.
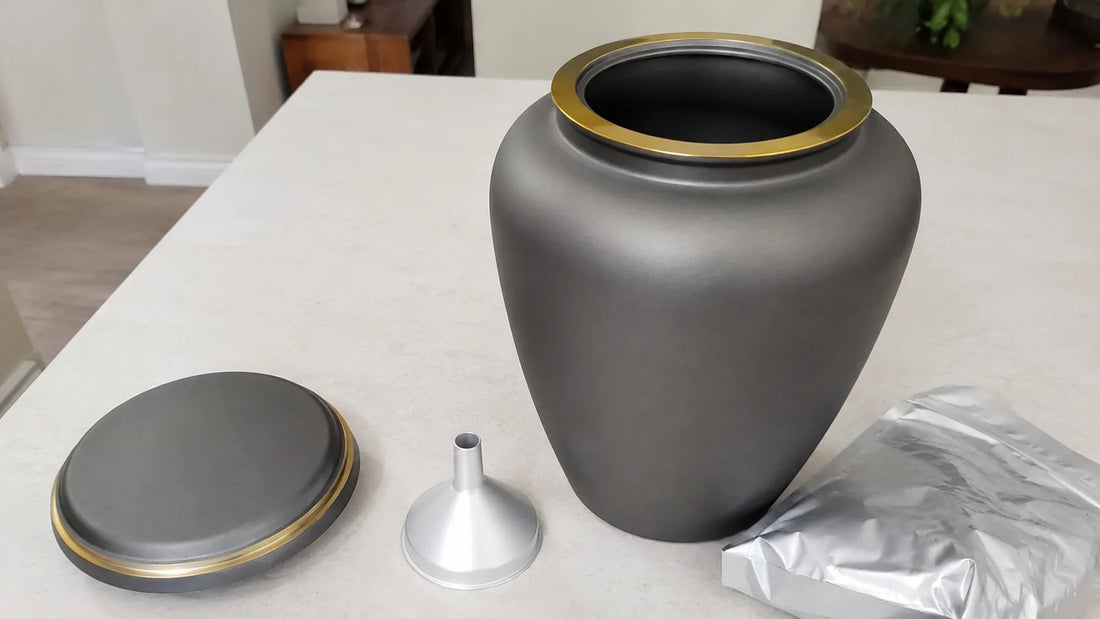
It also helps to set out a few practical items ahead of time:
- the urn and all of its parts
- the temporary container
- a clean towel, tray, or large sheet of paper to protect the surface
- a funnel if the urn opening is narrow
- scissors, only if you may need to pour from the bag
- a screwdriver if the urn opens from the bottom
- gloves, if you would feel more comfortable wearing them
A careful setup reduces the chance of spills and makes the moment feel less intimidating.
The Easiest Method: Place the Inner Bag Into the Urn
If the cremated remains are inside a sealed inner bag and that bag fits comfortably through the opening of the urn, this is often the simplest way to transfer the ashes.
Start by opening the urn fully and placing it securely on your work surface. Then open the temporary container and gently lift the inner bag. Support it from underneath rather than grabbing it tightly at one end. If there is identifying paperwork or a metal identification disc, keep track of it as you move.
Lower the bag into the urn slowly. In many cases, the bag can be eased into place without any pouring at all. Once it is seated properly, you can place the identification disc with the remains if appropriate, arrange the bag so it rests neatly inside the vessel, and then close the urn.
This method is often preferable because it keeps the remains contained throughout the transfer. The one thing you do not want to do is force the bag into an urn that is clearly too tight. If the fit seems wrong, stop.
When You Need to Pour the Ashes Instead
Sometimes the inner bag will not fit through the urn opening, even though the urn itself has enough interior capacity. This is especially common with decorative urns, keepsake urns, and other memorial pieces that have narrower filling openings. In that case, pouring is usually the better option.
Begin by positioning the urn so it cannot tip. If it opens from the top, keep it upright and place a funnel securely in the opening. If it opens from the bottom, you may find it easier to position the urn on its side, depending on the design.
When you are ready, open the inner bag carefully. Many people find it easiest to cut a small corner rather than opening the whole bag at once. A small opening gives you more control. Hold the cut corner close to the funnel or opening and pour slowly. There is no need to hurry.
If the remains do not flow smoothly, pause and gently tap the funnel or adjust the angle of the bag. If you are filling a keepsake urn or dividing the remains among several containers, a small scoop or spoon can help you work more precisely. Once you have finished pouring, check the rim and threads of the urn for any loose residue before closing it.
If You Are Dividing Ashes Between Multiple Urns or Keepsakes
Families do not always transfer cremated remains into one full-size urn. In some cases, one person keeps the main urn while others receive keepsakes, memorial jewelry, or smaller urns with a portion of the remains inside. The process is similar, but it requires more patience.
Before you begin, decide exactly how many containers you are filling and make sure each one is open, ready, and clearly identified. It is usually easiest to fill the main urn first and then portion smaller amounts into keepsakes. Smaller openings require slower work.
If there is a metal identification disc, many families choose to keep it with the primary urn. If you are unsure how to handle any identification item, ask the funeral home or crematory before making the transfer.
This is also the point where many people decide they would rather have a professional help. That is not a sign that you are unable to do it. Dividing remains among multiple containers can simply be more delicate than moving one inner bag into one urn.
How to Close and Secure the Urn
Once the transfer is complete, take a moment before sealing anything. Make sure the remains are sitting properly inside the urn. Check that no part of the bag is caught in the threads, no residue is sitting on the rim, and no paperwork that should remain outside the urn has been tucked in by accident.
If your urn has a threaded top, screw it on slowly and evenly. If it has a bottom-opening plate, replace the plate carefully and tighten the screws a little at a time rather than over-tightening one corner first. If the urn came with adhesive or sealant, do not use it automatically without thinking ahead.
Some families want a permanent seal right away, especially if the urn will be buried, placed in a niche, or moved frequently. Others prefer to wait because they may later divide the remains, travel with the urn, or change memorial plans. Permanent sealants can make reopening difficult, so it is worth deciding that intentionally.
After the urn is closed, store any remaining paperwork in a safe place. Even if the urn itself is engraved, it is wise to keep the accompanying documents.
Common Mistakes to Avoid
Most problems during a transfer are not serious, but they are usually preventable.
- Choosing an urn based only on appearance without confirming its capacity
- Trying to force the inner bag into an opening that is too narrow
- Cutting the bag too widely instead of making a small, controlled opening
- Working near fans, drafts, or a cluttered surface
- Using permanent adhesive before you are sure no future transfer will be needed
- Discarding labels, paperwork, or identification items too soon
Another common mistake is doing the transfer while emotionally rushed. There is no reason to hurry. If the moment feels too heavy, you can pause and come back later unless you have a practical deadline such as travel, burial, or a scheduled service.
When It Makes Sense to Ask for Help
Many families can transfer ashes into an urn at home, but there are situations where it makes sense to let a funeral home or crematory handle it. That is especially true if the urn is expensive or fragile, the opening is unusually narrow, the remains need to be divided among several containers, or you simply do not want the responsibility of doing it yourself.
Some people also find that the transfer feels more emotional than they expected. That is understandable. What seems like a practical task on paper can feel very personal in real life. There is no rule that says you have to do this with your own hands to do it lovingly.
If you are uncertain, call the provider and ask. Many funeral professionals handle this type of transfer regularly and can often do it quickly, cleanly, and respectfully.
Final Thoughts
So, how do you transfer ashes into an urn? Usually, you do it by first checking whether the inner bag can be placed directly into the urn. If it can, that is often the cleanest and simplest method. If it cannot, you can pour the cremated remains slowly into the urn with the help of a funnel and a well-prepared workspace.
The most important part is not finding a perfect technique. It is approaching the moment with care. Choose an urn that fits, prepare the area before you begin, keep identification with the remains, and work slowly. And if you would rather have the funeral home or crematory do it, that is a perfectly good choice too.
For many families, this step feels intimidating until they understand what it actually involves. Once you know what to expect, the process is usually simpler and calmer than it first appears. In the end, transferring ashes into an urn is about handling a loved one’s remains with dignity, patience, and respect.
Share
Continue reading


